How to Fix Microsoft OneDrive when it won't Install or Start on Windows 10

To fix this issue you will need to make a change in one of OneDrives registry locations, with this simple change OneDrive will once again install correctly and open normally on your PC. As a precaution before starting, make sure you create a system restore point, so you have a safe place to revert to if you make any mistakes.
If you’ve never created a restore point before do the following. Open the start menu, type Restore, then select Create a Restore Point when the option appears on the list. From the new window that appears, click Create in the bottom right section of the screen, then follow the instructions given by Windows. Once you have a restore point created, continue with the instructions below.
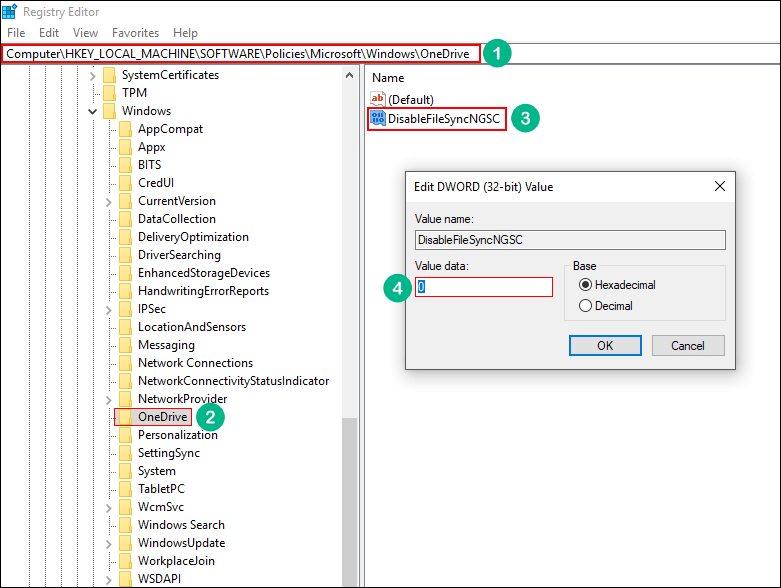
To begin, open the Registry Editor by pressing the Windows Key + R to open the Run tool, then type regedit into the text box and press Enter. When you have the Registry Editor open, navigate to the following address. (or copy and paste it into the address bar)
Computer\HKEY_LOCAL_MACHINE\SOFTWARE\Policies\Microsoft\Windows\OneDrive
When you are at the correct location double-click the DisableFileSyncNGSC entry in the central pane and change the Value Data from 1 to 0, then click Ok. After making the change, close the registry editor and install or open OneDrive.

It should now open normally and allow you to sign into your account. If it doesn’t, Uninstall OneDrive, Restart your computer then repeat the process. After this try to install OneDrive on your computer again.
Related Articles
How to Install Microsoft Office Apps
Summary This article will guide you through installing Microsoft Office apps on your computer. Follow these step-by-step instructions to install applications like Word, Excel, PowerPoint, and Outlook. Step 1: Sign in to Office 365 Open your web ...How to backup files using OneDrive
Video Tutorial The steps outlined in the video for turning on OneDrive backup Open the OneDrive app on your PC by clicking on the blue cloud icon. Click on the Settings icon (Gear). Click on Settings in the drop-down window. In the Settings, click on ...How to Enable Large Gallery View in Microsoft Teams
Engage with everyone in the meeting by viewing up to 49 participants’ video Microsoft Teams might be one of the leading contenders in the video conferencing ecosystem, but there are a few features it has been lacking in that its primary contender ...How to use Microsoft Quarantine to check and release emails
We understand that sometimes legitimate emails may be quarantined by mistake due to various security reasons. This is known as a false positive, and it can happen when an email matches certain criteria that are used to identify spam, phishing, ...How to Reset Your Microsoft 365 Password (Forgotten Password)
If you’ve forgotten your Microsoft 365 password, you can reset it yourself using Microsoft’s self-service password reset (SSPR) tool. Note: This process requires that you have previously set up your security verification methods (such as phone ...